Friday, 17 February 2012

Unable to open display ":0.0"

Unable to open display ":0.0" after issuing xhost +


  1. Ensure you have following rpm installed

  • [root@corelogic-srv4 ~]# rpm -qa | grep xorg
  • xorg-x11-apps-7.1-4.0.1.el5
  • xorg-x11-server-utils-7.1-5.el5_6.2
  • xorg-x11-xauth-1.0.1-2.1
  • xorg-x11-font-utils-7.1-3
  • xorg-x11-fonts-base-7.1-2.1.el5
  • xorg-x11-filesystem-7.1-2.fc6
  • xorg-x11-utils-7.1-2.fc6
  • xorg-x11-xinit-1.0.2-15.el5
  • xorg-x11-xfs-1.0.2-5.el5_6.1
   2. Ensure your xclock is running

   3. If  .Xauthority is already created on your root home. Rename it for .Xauthority_old.

   4. Install  Xming on your client machine.
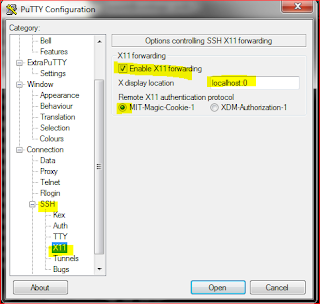
   5. Configure putty session with X11 (see below image)

   
    6. Start Xming your client machine
    7. Logged in root or other user in Putty ( if some reason other user has issue with    display , run  ---- xhost +    as root user and then try.
    8. Issue Xclcok ( you could see the window )
   

Cheers!


Tuesday, 7 February 2012

Export winscp sessions


It baffles me why WinSCP doesn’t have an “export saved sessions” button. Cause every time you reinstall your OS you have to through all the trouble of adding all the sites you ftp to.
Well i found that the sessions are store in the registry here:
?
1
HKEY_CURRENT_USER\Software\Martin Prikryl\WinSCP 2\Sessions
So just run[Start > Run] this command to export all your sessions.
?
1
regedit /e c:\winscp.reg "HKEY_CURRENT_USER\Software\Martin Prikryl\WinSCP 2\Sessions"
This will save a registry file on your c: drive called winscp.reg. You can take this and run it on another computer and you should have all your store sessions back.
Thought that might be useful. Good luck

Thursday, 2 February 2012

ORA-38760: This database instance failed to turn on flashback database


ORA-38760: This database instance failed to turn on flashback database
As per Oracle :


Error: ORA-38760 


Cause: Database flashback is on but this instance failed to start 
generating flashback data. Look in alert log for more specific 
errors. Action: Correct the error or turn off database flashback.


Solution A:


To Enable flashback:


1.Shutdown the database either in immediate or normal mode.


2.Mount the database.


3.Enable flashback. 


SQL>Alter database flashback on;


4.Open the database.


Sometimes even after solution A you are still getting errors:


SQL> startup mount;
ORACLE instance started.


Total System Global Area 1.4798E+10 bytes
Fixed Size 2046472 bytes
Variable Size 671090168 bytes
Database Buffers 1.4110E+10 bytes
Redo Buffers 14729216 bytes
Database mounted.
SQL> alter database flashback off;


Database altered.


SQL> alter database open;
alter database open
*
ERROR at line 1:
ORA-38760: This database instance failed to turn on flashback database


SQL> 


Then you should apply solution B.

Solution B:

1. Startup mount.


2. Check db_recovery_file_dest parameter and ensure this directory exists.


3. Check restore points:


select NAME,SCN,GUARANTEE_FLASHBACK_DATABASE,DATABASE_INCARNATION# 
from v$restore_point;


4. Drop restore point:


drop restore point ;


5. alter database flashback off;


6. Shutdown immediate;


7. Startup

Wednesday, 1 February 2012

Differences between GATHER STALE and GATHER AUTO

Purpose

To give an explanation of the differences between GATHER STALE and GATHER AUTO in the DBMS_STATS.GATHER_SCHEMA_STATS and DBMS_STATS.GATHER_DATABASE_STATS 
procedures.

Scope and Application

Intended for anyone collecting stats via the dbms_stats package

Differences between GATHER STALE and GATHER AUTO [ID 228186.1]


This is brief note to add some clarification in the area of the DBMS_STATS.GATHER_SCHEMA_STATS and DBMS_STATS.GATHER_DATABASE_STATS procedures.  The 'options' parameter of these two procedures allows you to provide further
specifications on which objects to gather statistics on. Two of the values that this parameter can take are 'GATHER STALE' and 'GATHER AUTO'.

Summary:

  • 'GATHER AUTO': Oracle implicitly determines which objects need new statistics, and determines how to gather those statistics. Oracle makes up its own mind based on its own criteria.
  • 'GATHER STALE': Oracle gathers on objects considered to be STALE. By default 10% of the rows need to change to trigger this.

Detail:

Oracle will gather statistics on objects which have statistics considered to be STALE. This is done by looking at the *_tab_modifications views. To the end user, this means that if more than 10% of the rows change, then statistics will automatically be gathered.

Oracle will gather automatically statistics on objects which currently have NO statistics (even if they have NO MONITORING set) *plus* existing objects with STALE statistics. Prior to Oracle 10g GATHER AUTO (just like GATHER STALE) required monitoring to be turned on for the objects which already have statistics. If monitoring is was not turned on, there was no way for Oracle to know which objects become stale. In 10g and above this is handled automatically.

When GATHER AUTO is specified in dbms_stats.gather_stats syntax, Oracle implicitly determines which objects need new statistics, and determines how to gather those statistics. Thus, Gather AUTO option can be used to allow Oracle to decide how much statistics to gather.

When GATHER STALE is specified, any other parameters specified will also be taken into account.

See:
OracleƂ® Database Performance Tuning Guide
11g Release 2 (11.2)
Part Number E16638-06
Chapter 13 Managing Optimizer Statistics
Section 13.3.1.8 Determining Stale Statistics


References

NOTE:295249.1 - Automated Object Statistics in 10gNOTE:114671.1 - Gathering Statistics for the Cost Based Optimizer (Pre 10g)NOTE:102334.1 - How to Automate Change Based Statistic Gathering - Monitoring Tables (Pre 10g)NOTE:237901.1 - Gathering Schema or Database Statistics Automatically in 8i and 9i - ExamplesNOTE:1073120.1 - DBMS_STATS 'gather auto' and 'gather stale' and column histogramsNOTE:457666.1 - How to list the objects having stale statistics (Use dbms_stats.gather_schema_stats options=>'LIST STALE')

DB Stats Gather

As you might know, there is an automatically created SCHEDULER JOB in every 10g database which runs every night and checks for object which have either no statistics at all or for which the statistics have becomeSTALE (which means stat at least 10% of the values have changed). This job is call GATHER_STATS_JOB and belongs to the autotask job class. It uses a program which again call a procedure from built in package DBMS_STATS which does the statistics collection. This feature only works if the initialization parameterSTATISTICS_LEVEL is set to TYPICAL at least (which is the DEFAULT in 10g) and it utilizes the TABLE MONITORINGfeature.
But here we creating separate Job for the database statistics collection.
Disable the default database stats collection job:
BEGIN
      sys.dbms_scheduler.disable(name=>'"SYS"."GATHER_STATS_JOB"', force => TRUE);
END;

Ensure default DB stats job has been disabled by running following query. The value of Enabled column should be FALSE.

select
owner,
job_name,
job_creator,
job_action,
repeat_interval,
last_start_date,
last_run_duration,
enabled
from dba_scheduler_jobs


Create new job for the Database stats gather.


BEGIN
    SYS.DBMS_SCHEDULER.CREATE_JOB (
            job_name => '"SYS"."JOB_GATHER_DB_STATS"',
            job_type => 'PLSQL_BLOCK',
            job_action => 'begin
DBMS_STATS.GATHER_DATABASE_STATS (estimate_percent => NULL, block_sample => FALSE, method_opt => ''''FOR ALL COLUMNS SIZE 1'''', cascade => TRUE, options =>''''GATHER'''', gather_sys => TRUE);
end;
',
            number_of_arguments => 0,
            start_date =>  trunc(sysdate)+22/24,
            repeat_interval => 'FREQ=DAILY;BYHOUR=22;BYMINUTE=0;BYSECOND=0',
            end_date => NULL,
            job_class => '"SYS"."DEFAULT_JOB_CLASS"',
            enabled => FALSE,
            auto_drop => TRUE,
            comments => 'Daily Database Stats Gathering Job');

     
    SYS.DBMS_SCHEDULER.enable(
             name => '"SYS"."JOB_GATHER_DB_STATS"');
END;
/


How to Run Cron Every 5 Minutes, Seconds, Hours, Days, Months

Question: How do I execute certain shell script at a specific intervals in Linux using cron job? Provide examples using different time periods.
Answer: Crontab can be used to schedule a job that runs on certain internal. The example here show how to execute a backup.sh shell script using different intervals.

Also, don't forget to read our previous
 crontab article that contains 15 practical examples, and also explains about @monthly, @daily, .. tags that you can use in your crontab.

1. Execute a cron job every 5 Minutes

The first field is for Minutes. If you specify * in this field, it runs every minutes. If you specify */5 in the 1st field, it runs every 5 minutes as shown below.
*/5 * * * * /home/ramesh/backup.sh
Note: In the same way, use */10 for every 10 minutes, */15 for every 15 minutes, */30 for every 30 minutes, etc.

2. Execute a cron job every 5 Hours

The second field is for hours. If you specify * in this field, it runs every hour. If you specify */5 in the 2nd field, it runs every 5 hours as shown below.
0 */5 * * * /home/ramesh/backup.sh
Note: In the same way, use */2 for every 2 hours, */3 for every 3 hours, */4 for every 4 hours, etc.

3. Execute a job every 5 Seconds

Cron job cannot be used to schedule a job in seconds interval. i.e You cannot schedule a cron job to run every 5 seconds. The alternative is to write a shell script that uses 'sleep 5′ command in it.
Create a shell script every-5-seconds.sh using bash while loop as shown below.
$ cat every-5-seconds.sh
#!/bin/bash
while true
do
 /home/ramesh/backup.sh
 sleep 5
done
Now, execute this shell script in the background using nohup as shown below. This will keep executing the script even after you logout from your session. This will execute your backup.sh shell script every 5 seconds.
$ nohup ./every-5-seconds.sh &

4. Execute a job every 5th weekday

This example is not about scheduling "every 5 days". But this is for scheduling "every 5th weekday".
The 5th field is DOW (day of the week). If you specify * in this field, it runs every day. To run every Friday, specify either 5 of Fri in this field.
The following example runs the backup.sh every Friday at midnight.
0 0 * * 5 /home/ramesh/backup.sh
(or)
0 0 * * Fri /home/ramesh/backup.sh
You can either user number or the corresponding three letter acronym for the weekday as shown below.
§  0=Sun
§  1=Mon
§  2=Tue
§  3=Wed
§  4=Thu
§  5=Fri
§  6=Sat
Note: Get into the habit of using Fri instead of 5. Please note that the number starts with 0 (not with 1), and 0 is for Sun (not Mon).

5. Execute a job every 5 months

There is no direct way of saying 'every 5 months', instead you have to specify what specific months you want to run the job. Probably you may want to run the job on 5th month (May), and 10th month (Oct).
The fourth field is for Months. If you specify * in this field, it runs every month. To run for the specific month, you have to specify the number that corresponds to the month. For example, to run the job on May and Oct, you should specify 5,10 (or) you can simply use the 3 letter acronym of the month and specify May,Oct.
The third field is for DOM (Day of the Month). If you specify * in this field, it runs every day of the month. If you specify 1 in this month, it runs 1st of the month.
The following example runs the backup.sh twice a year. i.e 1st May at midnight, and 1st Oct at midnight.
0 0 1 5,10 * /home/ramesh/backup.sh
(or)
0 0 1 May,Oct * /home/ramesh/backup.sh
Note: Don't make the mistake of specifying 5-10 in the 4th field, which means from 5th month until 10th month. If you want only 5th and 10th month, you should use comma.
Enable SSH login for root in Solaris


For the Local Console Login:

Edit  /etc/default/login file and commented the line:


# If CONSOLE is set, root can only login on that device.
# Comment this line out to allow remote login by root.
#
#CONSOLE=/dev/console

For the SSH(Putty) Login:

edit your /etc/ssh/sshd_config
there is a line:
PermitRootLogin no
set the value to yes and then:

pkill -HUP sshd


Below step could be used in Solaris 11

rolemod -K type=normal root